If you are looking for resources, songs and poems that have been shared previously on the blog, you can use the search tool on this page.
In the Northern Hemisphere, Summer Solstice is the longest day of the year. This year (2021) the sun will rise at 5:35 and set at 9:02 pm on Sunday, June 20 - after 15 hours and 26 minutes of daylight.
STRAWBERRIES - the berry of Summer Solstice!
Throughout the year, the point on the horizon where the sun rises and the point where the sun sets change each day, little by little. In the winter, the sunrise and sunset are close together on the horizon - the sun has a shorter journey across the sky and we have a shorter day. In the summer, the sunrise and sunset are wider apart on the horizon - the sun has a longer journey across the sky and we have a longer day. On the solstice, the sun appears to rise and set in the same position on the horizon for three days in a row. The word ’solstice’ means ‘sun stand still’ in Latin. After the summer solstice, the sun’s journey through the sky will once again begin to shorten, though the days still feel warm.
Excerpt from The Children’s Forest
Would you like to find out more about Summer Solstice? Check out this link.
SEASONAL POEM:
Artwork credit: Phoebe Wahl
Ferryman, ferryman row me over,
Row me over,
Row me over,
Out of the earth to the land of the sun.
Elves and dwarfs and gnomes and pixies,
Gnomes and pixies,
Gnomes and pixies,
Follow their path to the light of the sun.
Water sprites, sylphs and fire fairies gleaming,
Fire fairies gleaming,
Fire fairies gleaming,
Follow their path to the land of the sun.
See the sun is shining, turning,
Golden burning,
Shining, turning.
Over the earth on Midsummers’ Day.
~ M. Bucknall
SEASONAL SONG:
Photo credit: Glasgow Times
The Blessings of Light
Traditional Celtic Blessing adapted by Anna Richardson
May the blessings of light be upon you,
Light without and light within
May the blessed sunshine shine on you,
And warm your heart till it glows.
NATURE ADVENTURES & PROJECTS
Pack your backpack with a snack, water, and extra clothes and get ready to hit the trail (or your backyard!).
On these long and sunny days, going outside to play and explore is the best! Here are some outdoor adventures that make the most of this time of year:
Go strawberry picking
Relax in the shade on a blanket with your favourite books
Wade in a shallow creek and look for crayfish under the rocks
Make a shade fort with an old sheet
Play on the beach
Go swimming
Go for a paddle in a canoe
Stay up into the evening to watch the fireflies and listen to the crickets
Adventures can also take you in search of the materials you will need for the projects below…
Illustration Fireflies Midsummer by Loré Pemberton
SUMMER SUNSHINE WEAVING
Weave yellow sunshine in celebration of the sun.
Materials:
Yellow yarn (wool is best, as it is biodegradable)
Lengths of flexible plant stalks, 60 cm (2ft) or longer (e.g. dogwood, fresh willow, grapevine)
Scissors
Instructions:
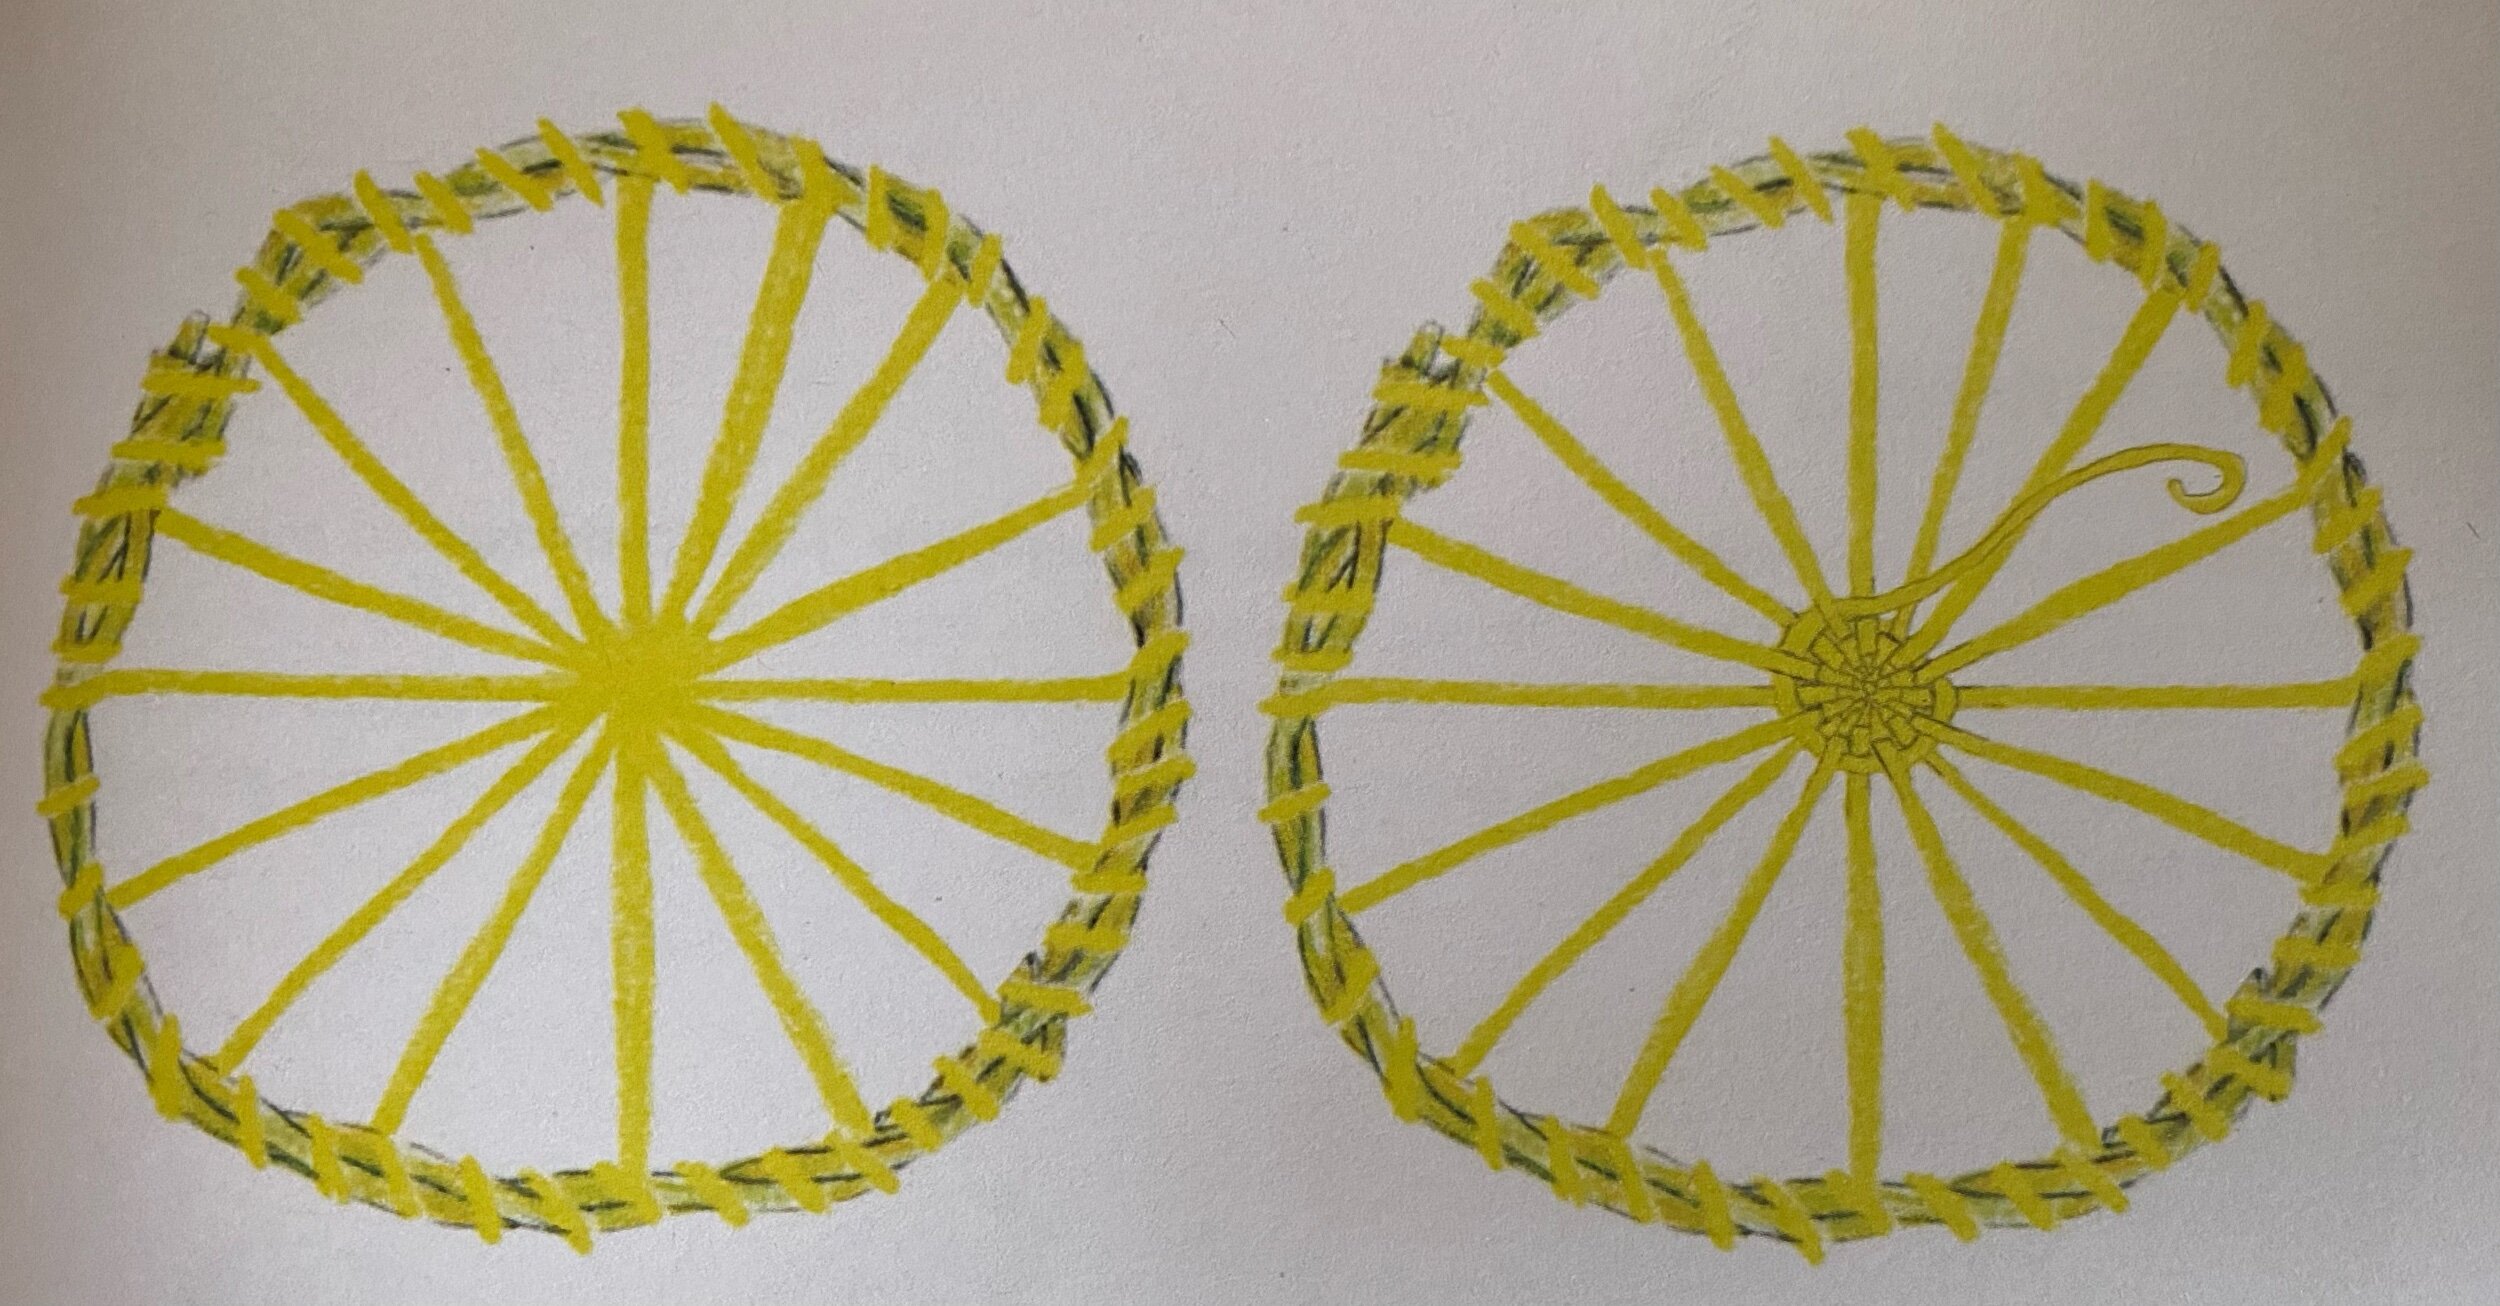
Begin by creating a circular frame. Bend the plant stalk around into a circle, overlapping the ends and weaving them under and over the circle to strengthen the weaving frame. If your stalk is long enough, your circular frame can be made of two rounds of stalk.
Secure the ends of the stalk together by tying with yellow yarn. Wind the yarn all around eh circumference of the circle - this secures the stalk pieces and creates a decorative frame for your weaving. When you get back to the place you started from, this the end of the yarn to the frame and cut off any spare.
Cut three (or more, if desired) lengths of yellow yarn - long enough to span the diameter of your circle. Tie each length from one edge of the circle to the opposite edge, overlapping in the centre - like the radial spokes of a bicycle. These will be the rays of sunshine.
Now take a little ball of yarn and, with one end, tie a knot in the centre of the frame, around one of the radial yarns. Weave the yarn in a sun wise (clockwise) direction, under and over the rays of sunshine, to create a circular yellow sun, growing outwards from the centre.
When the sun reaches the desired size, tie the yarn end to one of the radial yarns, and cut off any spare.
Tie a loop of yarn to the top of the frame to hang your sunshine in the branches or in a window.
Project from The Children’s Forest
You can find another sun weaving project here:
Photo credit: Busy, Busy Learning
SUN CATCHER
Materials:
Wax paper
Scissors
Tissue paper
Liquid starch or white craft glue
SUNDIAL
The sun and its dance with the earth are the original clock. Our ancestors knew how to read this clock accurately and, with the help of the moon, knew the exact times throughout the year, without a calendar, and understood the profound effects of these changes upon the land and their lives.
Excerpt from The Children’s Forest
A sundial makes visible the movement of the earth around the sun, to help us understand the passing of time. Choose a sunny day to make your sundial and see if you can tell time by the sun.
Photo credit: Sparkle Stories
Materials:
A straight stick (2 ft long)
A handful of small rocks
A marker or paint (if you want to put numbers on the rocks)
A watch
Instructions:
Starting at noon, find a sunny spot in your backyard.
Plant the stick so that it is standing straight up and down in the ground.
Place a stone at the end of the shadow cast by the stick.
Repeat this every hour until the sun sets.
At this point you will only have completed half of the sundial. Return the next morning to mark your shadows from sun-up to noon.
Or follow these instructions to make a paper sundial.
Notes:
The morning hours will be on the lefthand side, while the afternoon hours will be on the right.
To make it easier for smaller children to connect the movement of the sun to the passage of time, I place the numbered stones in order like a clock.
If you have older kids, they might be interested in creating a more scientific sundial – in which case you'd want to cut out a gnomon (or triangle) and then start from 6am and work forward throughout the whole day. To make a gnomon, cut out a 6in x 6in square of cardboard. Make a diagonal line from one corner to the opposite corner. Cut along the line and you have your triangle! You can glue this triangle on another square of cardboard to make it stable and mobile.
Questions to think about:
How will the shadows change at different times of year? Will they get longer or shorter?
Did the spot you chose at noon still have full sun at 3pm or 6pm? Does it have full sun in the morning?
Will your sundial work when it's cloudy?
FLOWER CROWN
Take advantage of all the colourful blooms at this time of year and make a crown in celebration of the Summer Solstice. You can find instructions on how to make a flower crown here.
HERBAL BATH
Soak up some of that glorious sun energy captured in the leaves of the herbs growing in your garden. The leaves can be dried and added to a bath.
Materials:
Garden herbs
Scissors
String
A clean sock (finally a use for the lone socks that show up from the laundry!)
Cup
Spoon
Instructions:
Part 1
Harvest herbs such as mint, chamomile, sage, thyme, lavender…
Set the herbs out to dry on a tray or tie them into bundled and hang them to dry (1 week)
Illustration credit: Madison Safer
Part 2
Once your herbs have dried, gather all of your supplies and lay them out on a work surface such as a table.
Have your child pick which ingredients they would like in their bath. Encourage your child to smell, touch and look at what is available.
Put a handful or big spoonful of each chosen ingredient into the cup. This is the mixture that will go into the sock. You want to have around 1 cup of bath mixture in the cup when you are done.
Using the spoon, have your child mix the herbs inside the cup.
Stretch the opening of the sock over the top of the glass and then have your child invert the cup so that the contents of the cup fall into the sock.
Tie the top of the sock into a knot. If your sock is not long enough to tie, use a rubber band or piece of string to secure it shut.
Encourage your child to squeeze and smell the sock. This will release the good smells of the herbs inside!
STORYTELLING
This week we are sharing the story: The Children and the Sun - a folktale from the San people of the Kalahari.
CONNECT WITH COMMUNITY
You have the opportunity to connect with other parents and families on the Nature (home)School journey through a private Facebook group. The digital forum is a place where you can post photos of the activities that you get up to with your children, share stories or inspirations from your outdoor adventures, and connect with other families. Please follow the link to connect with other families in the online community or from Facebook - search: Nature (home)School Support.


